Pella 80AT0102 User Manual
Browse online or download User Manual for Unknown Pella 80AT0102. Pella 80AT0102 User's Manual
- Page / 16
- Table of contents
- BOOKMARKS
- Part Number: 80AT0102 1
- ROUGH OPENING PREPARATION 2
- SETTING THE WINDOW 3
- CABLE CLAMP INSTALLATION 4
- FASTENING THE WINDOW 5
- INSULATING FOAM APPLICATION 6
- WALL CLADDING 6
- INTERIOR FINISHING 8
- IMPORTANT NOTICE 8
- EXTERIOR FINISH 8
- CARE AND MAINTENANCE 8
- ACABADO INTERIOR 9
- ACABADO EXTERIOR 9
- CUIDADO Y MANTENIMIENTO 9
- NOTA IMPORTANTE 9
- Exterior 11
- (continuación) 12
- SUJECION DE LA VENTANA 12
- INSTALACION DE ABRAZADERA 13
- DE CABLES 13
- COLOCACION DE LA VENTANA 14
- Interior 15
- Pieza No.: 80AT0102 16
Summary of Contents
INSTALLATION INSTRUCTION INSTRUCCIONES DE INSTALACION FOR BAY AND BOW WINDOW WITH SEAT BOARD VENTANAS DE MIRADOR CON TABLA DE ASIENTONote: These inst
D. Instale bloques sujetadores entre el extremo superior de la ventana y el plafón de alero como se muestra. Los bloques sujetadores deben quedar a ra
Precaución: Utilice exclusivamente espumas de poliuretano de baja expansión para instalación de puertas y ventanas, y siga al pie de la letra las reco
B. Lleve el cable hasta la base de la abrazadera de cables. Sostenga el cable tenso sobre la abrazadera y ajuste por completo los dos tornillos cent
Montaje de refuerzo cruzadoMontajedel cabeceroTuerca en forma de “T”Instale las abrazaderas de cables según el tipo de instalación que se requiera. La
F. Aplique la cinta tapajuntas No. 2 del alféizar. Corte un trozo de cinta tapajuntas que sea 12 pulgadas (30,5 cm) más largo que el ancho de la aber
ARTICULOS QUE USTED NECESITARA COMPRAR: HERRAMIENTAS NECESARIAS:• Calzas/espaciadores de madera de cedro o impermeables (12 a 20 unidades)• 10 clavos
INSTRUCCIONES DE INSTALACION PARA VENTANAS DE MIRADOR CON TABLA DE ASIENTONota: Estas instrucciones pueden utilizarse para todas las ventanas de mirad
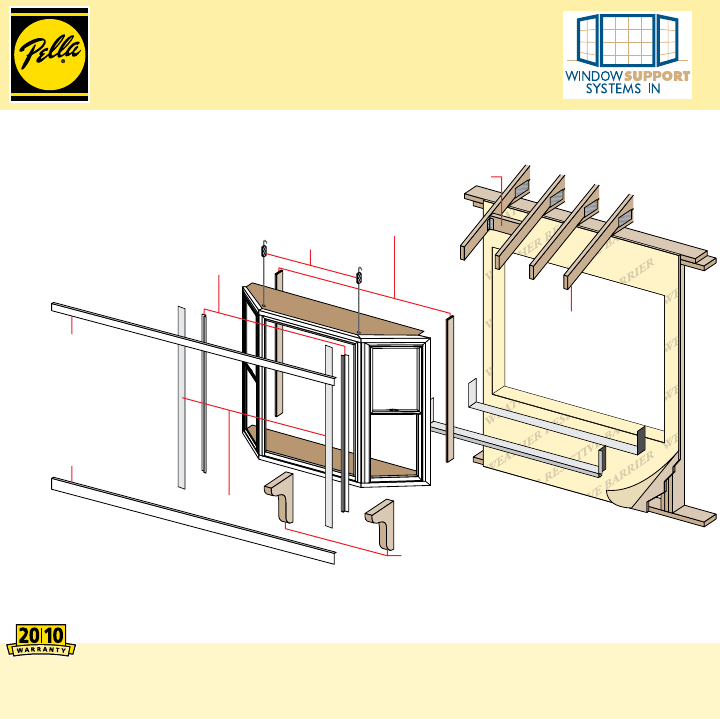
Interior1AInterior1BC. Cut the water resistive barrier. Fold side flaps into the opening and staple to inside wall.YOU WILL NEED TO SUPPLY: TOOLS REQU
TWO OR MORE PEOPLE WILL BE REQUIRED FOR THE FOLLOWING STEPS.1"1F2BInterior2CInterior2F2D1G2SETTING THE WINDOWF. Apply sill flashing tape #2. Cut
Install Cable Clamps based on type of installation needed. Cross Bracing Installation consists of attaching 2 x 6 cross bracing between the rafter tai
HEAD BOARDSEAT BOARD18" PROJECTIONMAXIMUMDASHED LINES INDICATEPOSSIBLE CONSTRUCTIONFOR GABLE ROOFMINIMUM10-1/2”A. Tighten the top hex nut on bot
Caution: Ensure use of low pressure polyurethane window and door insulating foams and strictly follow the foam manufacturer’s recommendations for appl
Frame expander Mark frame expander at the center of the wedgeCenter frame expander 6ENotch out 1/4”D. Install wood blocking between the top of the win
INTERIOR FINISHINGIf products cannot be nished immediately, cover with clear plastic to protect from dirt, damage and moisture. Remove any constructi
ACABADO INTERIORSi no puede realizar el acabado de los productos inmediatamente, cúbralos con plástico transparente para protegerlos de la suciedad,
Related products and manuals for Unknown Pella 80AT0102
 (12 pages)
 (8 pages)
(16 pages)
(8 pages)
(16 pages)
© 2020, manymanuals.com. All rights reserved. | 1.263 s |
 Manymanuals.com
 Manymanuals.de
 Manymanuals.fr
 Manymanuals.it
 Manymanuals.pl
 Manymanuals.cz
 Manymanuals.es
 Manymanuals-pt.com
Comments to this Manuals